Understanding the snowboard stance: get well grounded!
he snowboard stance is the foundation of everything else in snowboarding. Understanding how the stance works and why it is so important will give you the best possible start in the sport. This article will walk you through the process from start to finish.
Building blocks
Like many other sports it is important to have a solid starting point from which all other movements can follow. Football (soccer) ice hockey and kung-fu are just 3 examples of how placing your body in the most efficient starting position will aid your next movement. Snowboarding is exactly the same. If you get your snowboarding stance dialled early on, you will find everything else that follows as you improve feels that bit more natural.

Start on dry land!
Before you even think about stepping onto a snowboard, there are a number of things you can do to make sure you get your snowboard stance right. Take your time to get these right and you will see the benefit later on.
1: Find your stance width
When deciding on your stance width you should keep in mind the purpose of having a solid foundation. In order to control your snowboard you are going to need to apply pressure to both the nose and tail easily through your feet.
Play with the width of your stance until you find the comfortable feeling sweet spot. Your feet will more than likely end up being slightly wider than shoulder width apart.
Too narrow

A snowboard stance that is too narrow will cause you to feel unstable on your board. You will not have enough pressure over the tail and nose of your board to be able to control it properly.
Too wide

If your feet are too wide you will be restricted in the range of movement you have on your board. It will be difficult to turn and you won't feel natural or comfortable when riding.
Just right
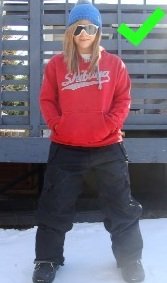
With feet slightly wider than shoulder width you will be stable and have a full range of movement. Your ability to apply pressure to all areas of your board will be maximised.
2: Are you a gooofy or regular rider?
"Goofy" and "regular" are the words used to describe whether a snowboarder rides with their left or their right foot at the front of the snowboard.
A goofy rider snowboards with their right foot at the front of their snowboard. A goofy rider will usually have a stronger left (back) leg and are often left handed. A regular rider snowboards with their left foot at the front of their snowboard. A regular rider will usually have a stronger right (back) leg and are often right handed.
how do you know? The goofy or regular test.
When starting out snowboarding it can be hard to know if you are a regular or goofy rider. You may even give both a go only to find that you can't notice much difference. Don't worry this is normal when you start to ride and there are some tricks you can use to help you decide which way to set up your snowboard stance.
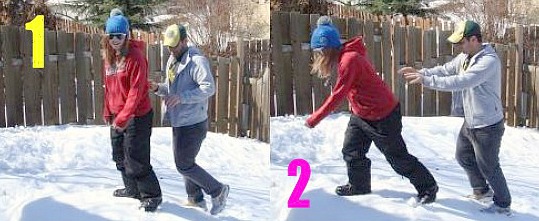
Stand in a comfortable position with both feet firmly on the floor and relax. Get a friend to gently push you from behind, forcing you to step forward to regain your balance. The foot that you use to steady yourself is the foot you want to use for your front foot on your snowboard. If you use your left foot you are a regular rider, if you use your right foot you are a goofy rider.
Double check
if you are still unsure or want to double test which foot you should use as your front foot in your snowboard stance then the following simple test will also help.
Stand at the foot of a flight of stairs, count from 10 to 1 backwards and then step onto the first step. The foot you use to step onto that first step will more often than not be the foot you want to use as your front snowboarding foot.
Remember, this is not a life or death choice. If you find that you are not getting on with a regular stance, switch to goofy and give it a try and vice versa. The only way you will know is by testing it out and seeing how you get on. Strap in and give it a go.
3. Understand your binding angles
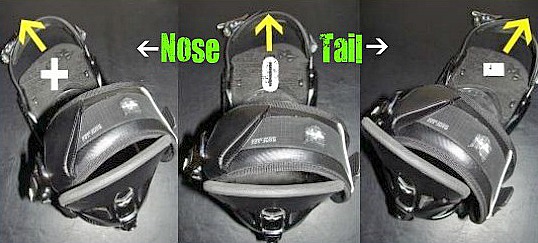
Now you know if you are a regular or a goofy rider it is important that you understand binding angles and how they will affect your riding
It's simple really!
Put simply, the stance angles are the angles at which your bindings are mounted in relation to your snowboard.
An angle of 0 degrees means that the binding is mounted pointing directly across the snowboard with no forward or backward tilt. A binding angle with plus degrees (+) means the binding is set pointing towards the nose of the snowboard. A binding angle with minus degrees (-) means the binding is set pointing towards the tail of the snowboard
Modern snowboard binding plates come with numbers etched on them by the manufacturer so you can easily determine what angle your binding is set at without getting out your protractor.
What are the stance options and how do they differ?
In modern everyday snowboarding there are only really 3 set-up options that are widely used. More stance options are available but they are only normally found in specialist types of riding and snowboard racing. Which stance you choose to start with depends on your prefered type of riding and experience level. Remember, all of the stances below can be tweaked to suit you and should be used as a guide only.
Stance 1: The forward stance
In this stance your back foot binding angle is set to around + 6 degrees and your front binding is mounted at a positive angle of about + 18 degrees. This stance is generally used for all mountain type riding and beginner snowboarders. It is great for carving but it is diffcult to learn how to ride switch (backwards) with this stance set-up.

Stance 2: The flat backfoot stance
In this stance your back foot binding angle is set to 0 degrees and your front binding is mounted at a positive angle. This stance will give you a lot of power from your back foot but will hinder your ability to ride switch (backwards). Typical angles for the front foot on this stance would be between + 15 and + 20 degrees.

Stance 3: The duck stance
n this stance your back foot binding angle is set to a minus angle and your front binding is mounted at a positive angle. This stance will give you a lot of options when riding and will allow you to ride backwards as easily as you can forwards. This is a good stance for freestyle riding and should be experimented with as your experience grows. Typical angles for the back foot on this stance would be between around - 6 and - 15 degrees. Your front foot is normaly set between + 15 and + 20 degrees. A mirrored duck stance is normally set at + 15 for the front foot and - 15 for the back foot.

4. Adjust the forward lean of your binding high back
Once you have decided your binding angles it is time to make sure that your high back is adjusted to perfectly suit you and give you the most support possible.
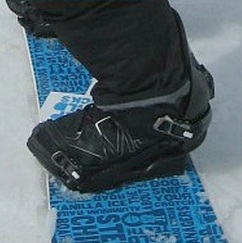
Get yourself in a solid stance position on your board. Your knees should be soft and flexed slightly but not too bent. The binding high back should feel snug against your calf muscle but still comfortable.
If there is room between your leg and the binding highback then you are going to have less control when riding and your set-up will feel sloppy. If this is the case then adjust the binding accordingly so that the high back tilts forward to meet your calf.
if the high back is set-up too far forward then you will feel it pushing you forward and off balance. It will feel uncomfortable when you stand in your snowboard stance and is not a good position to ride in. If this is the case then adjust the high back and tilt it backwards slightly. This will make your riding position a lot more comfortable.
5. Put it all together
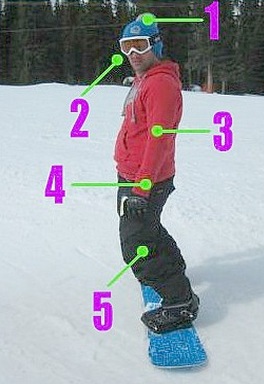
With all the components that go to making up the snowboard stance covered, it is time to strap in and give your new board set-up a try.
Find a flat surface where you can safely strap into your snowboard. A few minutes spent getting used to your snowboard stance and how some common movements feel will make all the difference later on.
1. For a good snowboard stance you should only turn your head to face the direction you are riding in. A common mistake is to turn from the hips and let your torso completely face forwards. This should be avoided as it will throw you off balance and make turning harder.
2. When riding keep your head up and look directly ahead of you. By avoiding looking down and keeping focused further infront of you, you will find it easier to stay well balanced and in control.
3. Your arms and shoulders should be loose and relaxed. Your hands will hang comfortably by your sides. Building a good snowboard stance is like bulding a puzzle. Every part is important.
4. Keep your hips soft and relaxed. They should be directly over your knees and feet as if there is a straight line connecting the three points.
5. Your knees are an important part of your body when snowboarding. It is essential to keep them relaxed, slightly bent and directly over your feet. When riding keep them soft so they easily flex with the ever changing terrain.
6. Get out there experiment and have fun
Now you know more about the snowboard stance, how it can be altered and what may be the best set-up for you it is important you get out on the snow and experiment. Play with your stance width and binding angles until you find a combination that suits you.
Finding your perfect snowboard stance is an ever changing process. As you improve and gain experience you will no doubt continue to tweak your stance looking for that perfect ride. Have fun and keep riding.
Get in touch
We hope this information on the snowboard stance has helped you out. If you have any questions and want to know more then please drop us an email through the Contact us page.




New! Comment using Facebook
Want to say something about this page? Leave a comment in the box below.